How To Install Apache Kafka on Ubuntu 20.04
Apache Kafka is a popular distributed message broker designed to handle large volumes of real-time data. A Kafka cluster is highly scalable and fault-tolerant. It also has a much higher throughput compared to other message brokers like ActiveMQ and RabbitMQ. Though it is generally used as a publish/subscribe messaging system, many organizations also use it for log aggregation because it offers persistent storage for published messages. How To Install Apache Kafka on Ubuntu 20.04
A publish/subscribe messaging system allows one or more producers to publish messages without considering the number of consumers or how they will process the messages. Subscribed clients are notified automatically about updates and the creation of new messages. This system is more efficient and scalable than systems where clients poll periodically to determine if new messages are available.
In this tutorial, you will install and configure Apache Kafka 2.8.2 on Ubuntu 20.04.
Prerequisites
To follow along, you will need:
- An Ubuntu 20.04 server with at least 4 GB of RAM and a non-root user with
sudoprivileges. You can set this up by following our Initial Server Setup guide if you do not have a non-root user set up. Installations with less than 4GB of RAM may cause the Kafka service to fail. - OpenJDK 11 is installed on your server. To install this version, follow our tutorial on How To Install Java with APT on Ubuntu 20.04. Kafka is written in Java, so it requires a JVM.
Step 1 — Creating a User for Kafka
Because Kafka can handle requests over a network, your first step is to create a dedicated user for the service. This minimizes damage to your Ubuntu machine in the event that someone compromises the Kafka server. You will create a dedicated kafka user in this step.
Log in to your server as your non-root sudo user, then create a user called kafka:
sudo adduser kafka
Follow the prompts to set a password and create the kafka user.
Next, add the kafka user to the sudo group with the adduser command. You need these privileges to install Kafka’s dependencies:
sudo adduser kafka sudo
Your kafka The user is now ready. Log in to the kafka account using su: su -l kafka
su -l kafka
Now that you’ve created a Kafka-specific user, you are ready to download and extract the Kafka binaries.
Step 2 — Downloading and Extracting the Kafka Binaries
In this step, you’ll download and extract the Kafka binaries into dedicated folders in your kafka user’s home directory.
To start, create a directory in /home/kafka called Downloads to store your downloads:
mkdir ~/Downloads
Use curl to download the Kafka binaries:
curl "https://downloads.apache.org/kafka/3.4.0/kafka_2.12-3.4.0.tgz" -o ~/Downloads/kafka.tgz
Create a directory called kafka and move to this directory. You’ll use this directory as the base directory of the Kafka installation:
mkdir ~/kafka && cd ~/kafka
Extract the archive you downloaded using the tar command:
tar -xvzf ~/Downloads/kafka.tgz --strip 1
You specify the –strip 1 flag to ensure that the archive’s contents are extracted in ~/kafka/ itself and not in another directory (such as ~/kafka/kafka_2.13-2.8.2/) inside of it.
Now that you’ve downloaded and extracted the binaries successfully, you can start configuring your Kafka server.
Step 3 — Configuring the Kafka Server
A Kafka topic is the category, group, or feed name to which messages can be published. However, Kafka’s default behavior will not allow you to delete a topic. To modify this, you must edit the configuration file, which you will do in this step.
Kafka’s configuration options are specified in server.properties. Open this file with nano or your favorite editor:
nano ~/kafka/config/server.properties
First, add a setting that will allow you to delete Kafka topics. Add the following line to the bottom of the file:
delete.topic.enable = true
Second, you’ll change the directory where the Kafka logs are stored by modifying the log.dirs property. Find the log.dirs property and replace the existing route with the highlighted route:
log.dirs=/home/kafka/logs
Save and close the file.
Now that you’ve configured Kafka, you can create systemd unit files for running and enabling the Kafka server on startup.
Step 4 — Creating systemd Unit Files and Starting the Kafka Server
In this section, you will create systemd unit files for the Kafka service. These files will help you perform common service actions such as starting, stopping, and restarting Kafka in a manner consistent with other Linux services.
Kafka uses Zookeeper to manage its cluster state and configurations. It is used in many distributed systems, and you can read more about the tool in the official Zookeeper docs. You’ll use Zookeper as a service with these unit files.
Create the unit file for zookeeper:
sudo nano /etc/systemd/system/zookeeper.service
Enter the following unit definition into the file:
[Unit]
Requires=network.target remote-fs.target
After=network.target remote-fs.target

[Service]
Type=simple
User=kafka
ExecStart=/home/kafka/kafka/bin/zookeeper-server-start.sh /home/kafka/kafka/config/zookeeper.properties
ExecStop=/home/kafka/kafka/bin/zookeeper-server-stop.sh
Restart=on-abnormal

[Install]
WantedBy=multi-user.target
The [Unit] section specifies that Zookeeper requires networking and the filesystem to be ready before it can start.
The [Service] section specifies that systemd should use the zookeeper-server-start.sh and zookeeper-server-stop.sh shell files for starting and stopping the service. It also specifies that Zookeeper should be restarted if it exits abnormally.
After adding this content, save and close the file.
Next, create the systemd service file for kafka:
sudo nano /etc/systemd/system/kafka.service
Enter the following unit definition into the file:
[Unit]
Requires=zookeeper.service
After=zookeeper.service

[Service]
Type=simple
User=kafka
ExecStart=/bin/sh -c '/home/kafka/kafka/bin/kafka-server-start.sh /home/kafka/kafka/config/server.properties > /home/kafka/kafka/kafka.log 2>&1'
ExecStop=/home/kafka/kafka/bin/kafka-server-stop.sh
Restart=on-abnormal

[Install]
WantedBy=multi-user.target
The [Unit] section specifies that this unit file depends on zookeeper.service, which will ensure that zookeeper gets started automatically when the kafka service starts.
The [Service] section specifies that systemd should use the kafka-server-start.sh and kafka-server-stop.sh shell files for starting and stopping the service. It also specifies that Kafka should be restarted if it exits abnormally.
Save and close the file.
Now that you have defined the units, start Kafka with the following command:
sudo systemctl start kafka
To ensure that the server has started successfully, check the journal logs for the kafka unit:
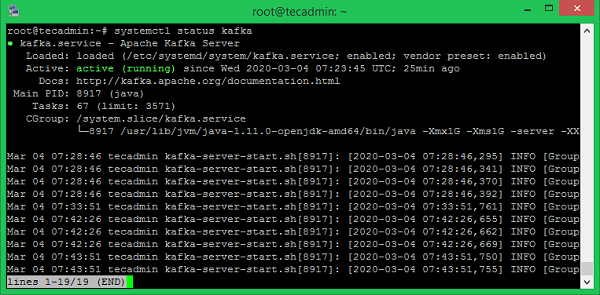
sudo systemctl status kafka
You will receive output like this:
Output
● kafka.service
Loaded: loaded (/etc/systemd/system/kafka.service; disabled; vendor preset>
Active: active (running) since Wed 2023-02-01 23:44:12 UTC; 4s ago
Main PID: 17770 (sh)
Tasks: 69 (limit: 4677)
Memory: 321.9M
CGroup: /system.slice/kafka.service
├─17770 /bin/sh -c /home/kafka/kafka/bin/kafka-server-start.sh /ho>
└─17793 java -Xmx1G -Xms1G -server -XX:+UseG1GC -XX:MaxGCPauseMill>